Solid State Drives (SSDs) have become the preferred storage solution for modern computers because they are faster, quieter, and more reliable than traditional hard disk drives (HDDs). Whether you use your computer for work, gaming, content creation, or everyday browsing, your SSD plays a critical role in storing your operating system, applications, and personal files. However, despite their reliability, SSDs are not immune to wear and tear. Every SSD has a limited number of write cycles, which means its health gradually decreases as data is written and erased over time.
This is why learning how to check SSD health is important. A simple SSD health check can help you identify performance issues, detect early signs of failure, and avoid unexpected data loss. Modern SSDs include built-in monitoring systems that track their condition and provide valuable information about their remaining lifespan. By reviewing this information regularly, you can determine whether your drive is operating normally or approaching the end of its useful life.
Fortunately, checking SSD health is easier than many people think. Windows, macOS, and Linux all provide tools that allow users to monitor storage devices. Additionally, several SSD diagnostic tools can provide detailed reports about SSD health status, wear levels, temperatures, and performance metrics.
In this guide, you’ll learn how SSD health monitoring works, how to check SSD health on different operating systems, how to understand SSD health percentages, and what warning signs indicate a failing SSD.
What Is SSD Health?
SSD health refers to the overall condition, reliability, and remaining lifespan of a solid-state drive. Unlike traditional hard drives that rely on spinning platters and moving read/write heads, SSDs use flash memory chips to store data. These flash memory cells can only handle a certain number of write and erase operations before they begin to wear out. As a result, every SSD has a finite lifespan.
To help users monitor this wear, SSD manufacturers include built-in tracking systems that collect information about the drive’s usage and condition. This information is often displayed as a health percentage or through detailed SMART attributes. A brand-new SSD typically starts at 100% health and gradually decreases as the drive accumulates more writes over time.
SSD health does not simply indicate whether a drive is functioning or failing. It provides insight into several important factors, including temperature, available spare blocks, error rates, and total data written. These metrics help estimate how much useful life remains in the drive.
Monitoring SSD health regularly allows users to detect problems before they become critical. For example, a sudden increase in error counts or a significant drop in available spare blocks may indicate that the drive is experiencing hardware issues. By identifying these warning signs early, users can back up their data and replace the SSD before a complete failure occurs.
Understanding SSD health is the first step toward maintaining reliable storage and protecting valuable data.
How SSD Health Monitoring Works
Modern SSDs continuously monitor their own condition using a technology called S.M.A.R.T., which stands for Self-Monitoring, Analysis, and Reporting Technology. Originally developed for hard drives, SMART has evolved into one of the most important tools for monitoring SSD health and predicting storage failures.
The SSD controller constantly collects information about various aspects of drive performance and wear. This data is stored internally and can be accessed through operating system utilities or specialized SSD health monitoring software. The purpose of SMART is to provide an early warning system that alerts users when the drive begins to show signs of degradation.
Unlike traditional storage devices, SSDs experience wear primarily through write operations. Every time data is written, erased, or modified, tiny memory cells inside the drive experience a small amount of wear. SMART technology tracks this activity and records key indicators such as total host writes, wear leveling counts, available spare blocks, and error rates.
Many SSD health check tools convert this technical information into an easy-to-understand health percentage. For example, a drive showing 95% health is generally considered to be in excellent condition, while a drive showing 20% health may be nearing the end of its expected lifespan.
The advantage of SMART monitoring is that it provides visibility into the internal condition of the SSD long before obvious symptoms appear. Instead of waiting for a drive to fail unexpectedly, users can review health reports regularly and take preventive action when necessary.
Also Read: Recover Files After Windows Reinstallation (2026 Expert Guide)
Important SSD Health Indicators You Should Understand
When performing an SSD health check, you’ll encounter several technical metrics. Understanding these indicators can help you accurately assess the condition of your drive and determine whether any action is required.
SSD Health Percentage
The SSD health percentage is one of the most commonly displayed values in monitoring software. It provides a simplified estimate of the drive’s remaining lifespan. While calculation methods vary between manufacturers, a higher percentage generally indicates a healthier drive.
Total Host Writes (TBW)
Total Host Writes measures the amount of data written to the SSD during its lifetime. Manufacturers often provide a TBW (Terabytes Written) rating that indicates how much data can be written before the drive reaches its expected endurance limit.
Available Spare Blocks
SSDs reserve additional memory cells that can replace worn-out blocks. As the drive ages, these spare blocks are gradually used. A decreasing available spare value may indicate increasing wear.
Temperature
SSD temperature has a direct impact on longevity and performance. Most SSDs operate best between 30°C and 60°C. Sustained temperatures above 70°C can accelerate wear and potentially reduce lifespan.
Media Errors
Media errors occur when the SSD has difficulty reading or writing data. Occasional errors may not be serious, but a growing error count should be investigated immediately.
Wear Leveling Count
Wear leveling is a technique SSDs use to distribute writes evenly across memory cells. This metric helps determine how much wear the drive has accumulated over time.
By understanding these indicators, users can move beyond simple health percentages and gain a clearer picture of their SSD’s actual condition.
How to Check SSD Health on Windows
Windows provides several methods for checking SSD health, ranging from built-in tools to advanced third-party applications. Most users can obtain basic health information without installing any additional software, while advanced users can access detailed SMART data for deeper analysis.
Method 1: Check SSD Health Using Windows Settings
Windows 11 includes a built-in drive health monitoring feature that displays important information about storage devices.
To access it:
- Open Settings.
- Click System.
- Select Storage.
- Open Advanced Storage Settings.
- Click Disks & Volumes.
- Select your SSD.
- Open Properties.
Depending on your system, Windows may display information such as estimated remaining life, drive temperature, and overall health status. This method is ideal for users who want a quick overview without installing additional software.
Method 2: Check SSD Health Using PowerShell
PowerShell provides another simple method for viewing SSD health information.
Open PowerShell as Administrator and run:
Get-PhysicalDisk
The command displays several details, including HealthStatus and OperationalStatus. A status of “Healthy” generally indicates that the SSD is functioning normally without any detected issues.
Method 3: Check SSD Health Using Command Prompt
For a quick SSD diagnostic check, Windows includes a built-in command:
wmic diskdrive get status
This command returns a simple result such as “OK” or “Pred Fail.”
Although this method does not provide detailed SMART information, it offers a quick way to identify obvious drive issues.
Method 4: Check SSD Health Using CrystalDiskInfo
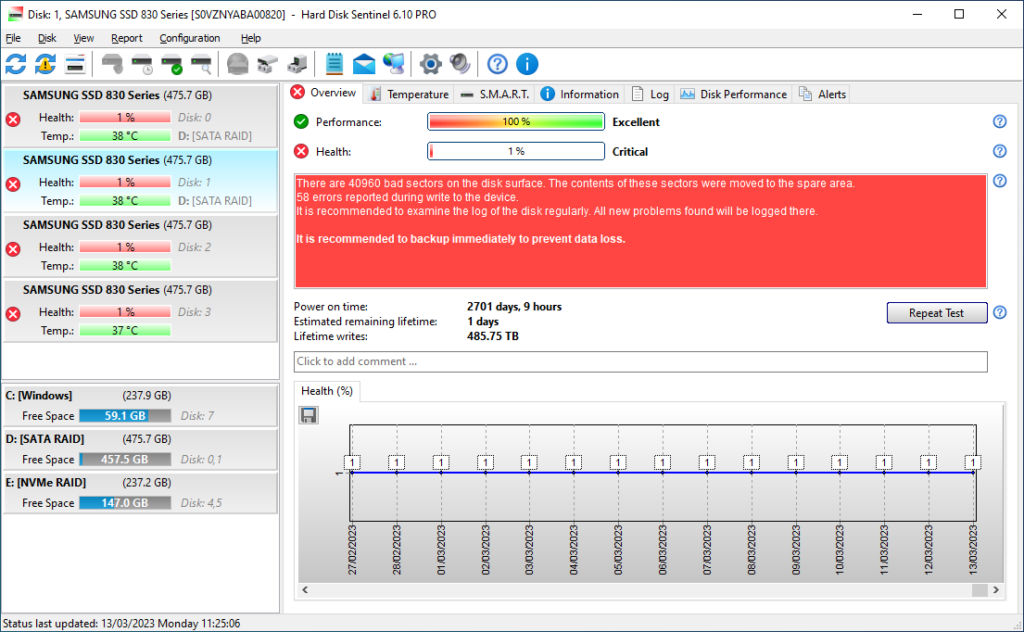
If you want more detailed information than Windows provides through its built-in tools, CrystalDiskInfo is one of the best SSD health monitoring applications available. It is a free utility that reads S.M.A.R.T. data directly from your SSD and presents the information in an easy-to-understand format. Many IT professionals, technicians, and advanced users rely on CrystalDiskInfo because it provides a comprehensive overview of drive health without requiring technical expertise.
After installing and launching CrystalDiskInfo, the software automatically detects all connected storage devices. The main dashboard displays key information such as the SSD model, firmware version, operating temperature, health percentage, power-on hours, and total host writes. Most importantly, it provides a clear health status indicator that usually appears as Good, Caution, or Bad.
One of the biggest advantages of CrystalDiskInfo is its ability to display detailed S.M.A.R.T. attributes. Users can review metrics such as available spare blocks, wear leveling count, reallocated sectors, and error counts. These values offer deeper insight into the SSD’s condition than a simple health percentage.
The software also monitors SSD temperature in real time. Excessive heat can reduce SSD lifespan and affect performance, so keeping an eye on temperature is important. If CrystalDiskInfo reports unusually high temperatures, improving airflow inside the computer may help protect the drive.
For users looking for the most reliable SSD health check on Windows, CrystalDiskInfo remains one of the easiest and most effective tools available.
How to Check SSD Health on macOS
Mac users can also monitor SSD health using built-in utilities and command-line tools. While macOS does not provide the same level of detailed SSD health reporting as some Windows applications, it still offers several methods for checking whether a drive is functioning correctly.
The easiest option is Disk Utility. This application comes pre-installed with every Mac and allows users to scan storage devices for file system errors. To access it, open Applications, navigate to Utilities, and launch Disk Utility. Select your SSD from the sidebar and click First Aid. The utility will inspect the drive and report any detected issues.
Another useful method involves checking the drive’s S.M.A.R.T. status through System Information. Click the Apple menu, select About This Mac, and then open System Report. Navigate to the Storage section and locate your SSD. Here, you’ll typically find a S.M.A.R.T. status field.
If the status reads “Verified,” the drive is operating normally. If it shows “Failing” or a similar warning, immediate action is recommended. Back up your important files and consider replacing the drive as soon as possible.
Advanced users can access even more information using smartmontools, a command-line utility that provides detailed S.M.A.R.T. reports. After installing the software, running the appropriate command displays comprehensive health data, including temperature, wear indicators, and error logs.
Regular SSD health checks on macOS can help identify developing issues before they impact system stability or result in data loss.
How to Check SSD Health on Linux
Linux provides powerful tools for monitoring SSD health, although most methods rely on command-line utilities rather than graphical interfaces. The most widely used solution is smartmontools, an open-source package that can access detailed S.M.A.R.T. information from SSDs and hard drives.
The first step is installing smartmontools through your distribution’s package manager. Once installed, users can perform a basic health check using a simple command that evaluates the overall condition of the SSD.
The health test typically returns either PASSED or FAILED. A PASSED result indicates that the drive has not detected any major issues, while a FAILED result suggests a significant problem that requires immediate attention.
For a deeper analysis, users can generate a complete S.M.A.R.T. report. This report includes information such as:
- SSD temperature
- Total host writes
- Power-on hours
- Wear leveling statistics
- Error logs
- Available spare blocks
- Remaining lifespan estimates
These metrics help users understand both the current condition and long-term durability of their SSD.
Many Linux administrators also configure automated S.M.A.R.T. monitoring so the system can alert them when health indicators change. This proactive approach is especially useful on servers, workstations, and systems that store important data.
Although Linux SSD health monitoring may appear technical at first, smartmontools provides some of the most accurate and detailed diagnostic information available.
How to Interpret SSD Health Results
Running an SSD health check is only the first step. Understanding what the results mean is equally important because it helps determine whether any action is necessary.
Most SSD monitoring tools provide an overall health status along with a percentage score. A health rating between 90% and 100% generally indicates that the SSD is in excellent condition and functioning as expected. This is common for relatively new drives or those with moderate usage.
Health levels between 70% and 89% usually indicate normal wear. At this stage, the drive remains reliable, but users should continue monitoring it periodically. SSDs are designed to handle significant amounts of data writing, so minor reductions in health are expected over time.
When health drops below 50%, it becomes more important to monitor the drive closely. While the SSD may still function properly, wear is becoming more significant. Users should ensure that backups are current and watch for any warning signs.
If the health percentage falls below 20%, the drive may be approaching the end of its usable lifespan. Although some SSDs continue operating for years beyond this point, replacement planning should begin immediately.
In addition to health percentages, users should review other metrics. High temperatures, increasing error counts, and declining spare block availability can all indicate potential problems even when the overall health score appears acceptable.
Understanding these results allows users to make informed decisions and avoid unexpected storage failures.
Common Signs of SSD Failure
Even with SSD health monitoring tools available, it’s important to recognize the symptoms of a failing SSD. In many cases, physical signs of deterioration become noticeable before complete failure occurs.
One common symptom is a significant decrease in system performance. Applications may take longer to launch, file transfers may slow down, and the operating system may become less responsive. While performance issues can have multiple causes, a deteriorating SSD is often a contributing factor.
Frequent crashes are another warning sign. If the system unexpectedly freezes, displays error messages, or experiences blue screens, the SSD could be struggling to read or write data correctly.
File corruption is particularly concerning. Documents that suddenly become unreadable, missing files, or damaged folders may indicate storage problems. Whenever file corruption occurs repeatedly, users should perform an SSD health check immediately.
Some SSDs may also enter a read-only state when they approach the end of their lifespan. This protective measure prevents further damage and allows users to recover data before complete failure occurs. While the drive may still be accessible, new files cannot be saved.
Boot failures are another major warning sign. If the computer struggles to start, repeatedly enters recovery mode, or fails to detect the SSD, hardware failure may be developing.
Recognizing these symptoms early and combining them with regular SSD health monitoring can significantly reduce the risk of permanent data loss.
Conclusion
Learning how to check SSD health is an essential part of maintaining a reliable computer. Modern SSDs provide excellent performance and durability, but like all storage devices, they experience wear over time. Regular monitoring allows users to detect potential problems before they lead to system instability or data loss.
Whether you use Windows, macOS, or Linux, there are several methods available for checking SSD health. Built-in operating system tools can provide basic information, while advanced SSD diagnostic tools such as CrystalDiskInfo offer detailed insights into drive condition, temperature, wear levels, and S.M.A.R.T. attributes.
By understanding SSD health percentages, reviewing important indicators such as total host writes and spare blocks, and paying attention to warning signs of failure, users can make informed decisions about their storage devices. Routine SSD health checks take only a few minutes but can prevent costly downtime and protect valuable data.
The best approach is simple: monitor your SSD regularly, maintain current backups, and act promptly if health indicators begin to decline. Doing so will help ensure your SSD continues to deliver reliable performance for years to come.
Frequently Asked Questions
How do I check my SSD health quickly?
The quickest method on Windows is using Command Prompt and running the command:
wmic diskdrive get status
For more detailed information, CrystalDiskInfo is recommended because it displays health percentages, temperature readings, and S.M.A.R.T. attributes.
What is a good SSD health percentage?
A health percentage above 90% is considered excellent. Most SSDs continue operating reliably even when health drops below 80%. However, values below 20% suggest the drive is nearing the end of its expected lifespan.
Can an SSD fail suddenly?
Yes. While S.M.A.R.T. monitoring can detect many issues, some SSD failures occur unexpectedly. This is why regular backups remain essential even when the drive appears healthy.
How often should I check SSD health?
For most users, checking SSD health once a month is sufficient. Users who work with critical data may prefer weekly monitoring.
Does SSD temperature affect lifespan?
Yes. High temperatures accelerate wear and can reduce SSD lifespan. Most manufacturers recommend keeping SSD temperatures below 70°C, with 30°C to 60°C being the ideal operating range.